FTP Service
This document outlines how to use SecurityTrax' FTP service.
Create a user account for the SecurityTrax Platform (REQUIRED)
The SecurityTrax FTP service is provided over secure FTP. This service can be accessed by any FTP client with the ability to connect to such a service. For the purposes of this how-to document, we will use a free client for Microsoft Windows called WinSCP. If you do not have an FTP client and want to use WinSCP go to winscp.net and get the most up-to-date stable version.
FTP Client Settings
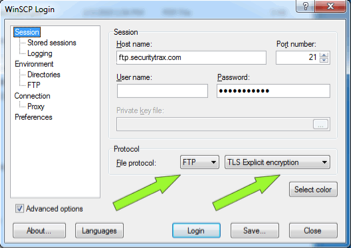
Once you run WinSCP you will see a login window similar to this screenshot:

- Check the Advanced options box in the lower left of the window
- In the Session section for the Host name type in ftp.securitytrax.com
- For Port number use 21
- Type in the User name and password provided to you at the time of the FTP Service setup
- Under the Protocol section select “FTP” in the first drop-down menu (the left green arrow)
- Select “TLS Explicit encryption” in the second drop-down menu (the right green arrow)
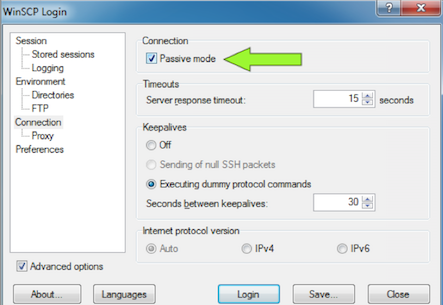
Now in the section on the left of the window, click on Connection and you will see a screen similar to this:

- Check the Passive Mode box under the Connection Section (green arrow)
- If this is your first time setting up WinSCP click the save button to save these login settings
- Once you have saved the settings you can click the Login button
Moving Files onto the Server
Once you are logged in, you will see a split screen with your local file system on one side and the FTP file system on the other side. In the ‘customerfiles’ directory on the FTP file system, there are two directories called ‘account_number’ and ‘securitytrax_id’. Files put into these directories will be processed periodically and will be attached to matching customer records.
You can now move files from your local file system into one of these directories. The file name must correlate to the directory it is placed in. Here are some examples:
Example A – Attaching via account number: Given an account with N123456 you would place a file named N123456.pdf in the ‘account_number’ directory.
Example B – Attaching via SecurityTrax customer ID: Given an account with ID 101 you would place a file named 101.pdf in the ‘securitytrax_id’ directory.
The server will periodically attempt to attach files place in either of these directories. There are two possible outcomes for each file processed:
- The account is properly identified and the file is attached to the customer and removed from the FTP file system. Your file will now be accessible through the SecurityTrax website.
- The account is not identified and the file will be moved to the proper ‘unidentified’ directory. Files in the unidentified directories will not be processed and should to be dealt with manually.