CMS
Using the CMS integration within SecurityTrax will allow you to onboard accounts to CMS directly from your SecurityTrax Platform. This will save you time and effort and increase the accuracy of the data that is sent to CMS when creating accounts with them.
Setting up the Integration
The first thing you need to do to enjoy this SecurityTrax Feature is to activate the integration connection from your SecurityTrax Platform to CMS. To do this you need to obtain your integration information from CMS. Contact the CMS Dealer Support Team at 800-522-5124 to get your personal list of System Types and production credentials. The list of System Types will be input during the integration set up. Once you have them follow these steps:
- Contact SecurityTrax to add the CMS Integration permissions to your Site.
- Go to the ‘Administration’ Tab.
- Click on the ‘Monitoring Companies’ link under the Content Management section
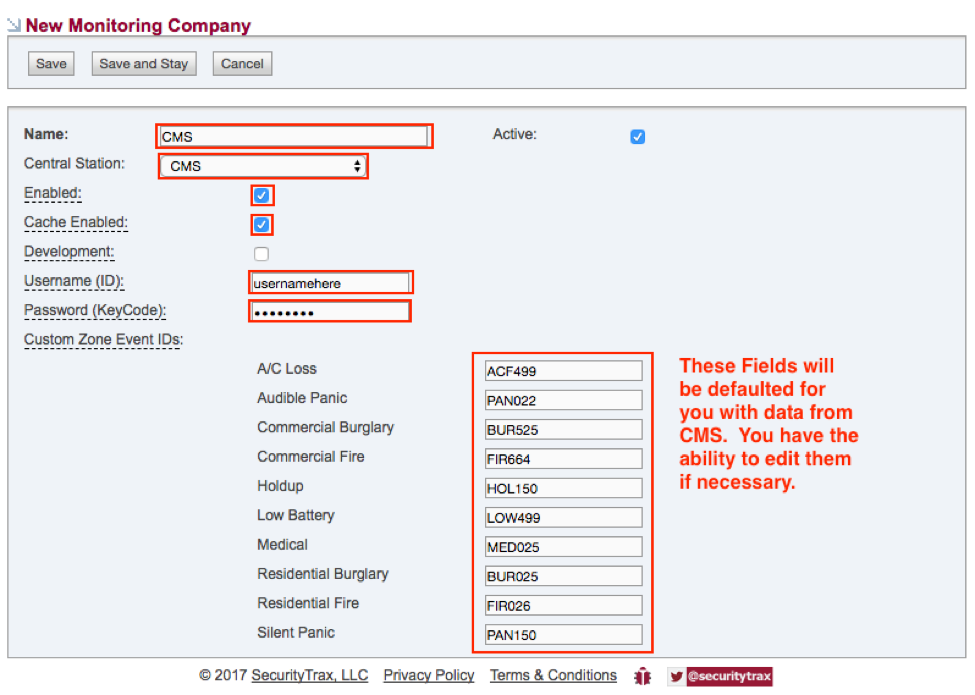
- Click the ‘add monitoring company’ link at the top and name your new monitoring company CMS and choose the CMS option from the Central Station drop-down.
- Once you have done that you will see additional fields appear. Enter all the credentials that you received from CMS. Also, check the Enabled box, and Cache Enabled box. DO NOT check the Development box.
- Click Save. Your CMS integration will now be connected. If you receive an error it is likely that your credentials are incorrect. You should Contact CMS to get valid credentials.
Using the Integration
Create the Customer Record in SecurityTrax: Before you attempt to onboard an account at CMS you need to make sure that your customer record is fully filled out. If you lack data points on your customer record that are required by CMS to create an account you will see errors when you push the account to them. Best Practice is to fill in as much information about the customer as possible. Here is a list of the minimum required information that must be included on your customer record according to CMS:
- Name
- Street Address
- City. State, Zip Code
- Premise Phone Number
- Cross Street
- Abort Code
- Account Number / Central Station Number
- Dealer Number
- Panel Type *
- System Type *
*These data points will be chosen/recorded in the Integration screen and are not data points that SecurityTrax stores.
Additional data points that CMS highly recommends including are as follows:
- Emergency Contacts (to reduce false alarms). Also, if the account is in a required EVC area or the dealer enforces EVC for all their accounts even if not required, at least 1 phone contact should be used.
- Go to the ‘Administration’ Tab in SecurityTrax.
- Equipment Zone details
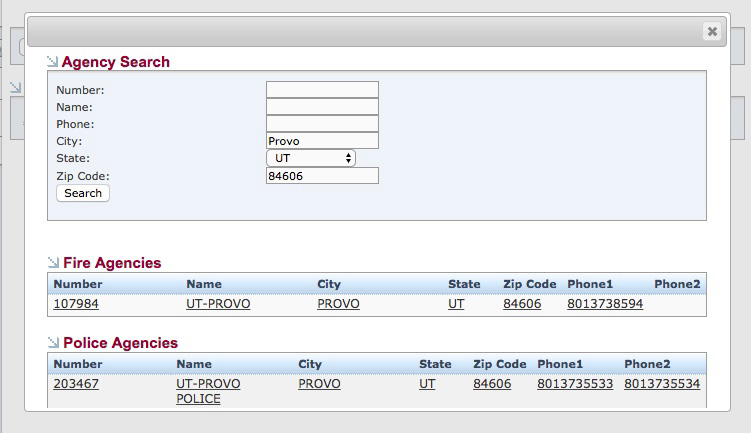
- Agency information: Police, Fire, Medical. (Limits the possibility of delay when required to dispatch on an alarm.) If you want CMS to have the agency information you need to add it to the integration screen, so don’t input anything until you’re pushing the account to CMS which will be explained later. When you open the search section it will automatically search and display results. Simply select the appropriate Agency.
Once you have fully built out your customer in SecurityTrax you are ready to push the account to CMS.
Pushing/Activating the account with CMS:
To push and activate the account with CMS do the following:
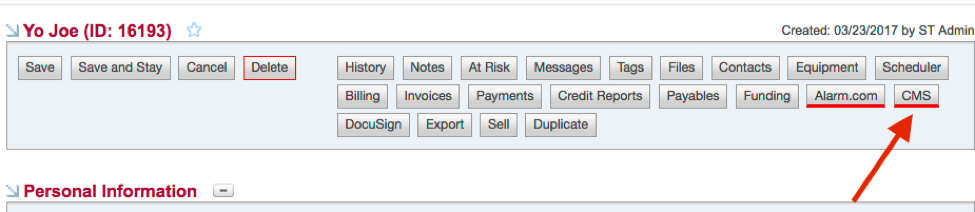
- On the “Customer” screen, click on the “CMS” Button. This button will not show up until you have chosen CMS from the “Monitored By” drop-down and saved the Customer record.
- A new window will open. This is the CMS integration window. Click “Create Account” from the drop-down.
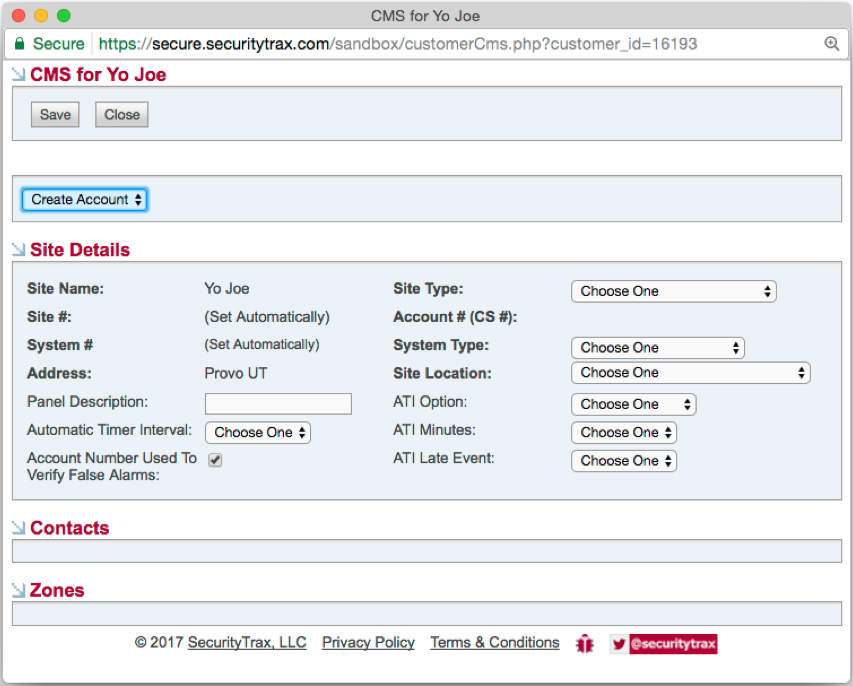
- Fill in all the required information in the blank fields and drop-downs as applicable for the customer and system. If you are unable to submit the account, verify that you have selected an option for: Site Type, System Type and Site Location within the CMS Integration window.
- After you have completed the required fields, save and the account by clicking the save button within the integration window. This account will now be activated with CMS.
Managing Active Accounts
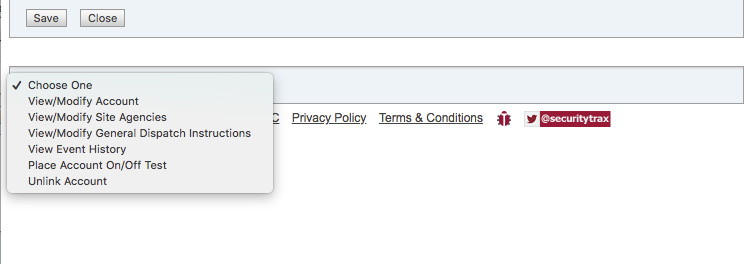
- View/Modify Account: This option will allow you to view the account data and make changes or modifications
- View/Modify Site Agencies: This option will allow you to add or select an Agency. See below for instructions on how to add an Agency.
- View/Modify General Dispatch Instructions: This option will allow you to add gGeneral Dispatch Instructions that can be temporary (with an expiration date) or permanant.
- View Event History: This option will allow you to view any changes or actions that have been made on this account.
- Place Account On/Off Test: This option allows you to place an account On/Off Test. You also have the ability to set an expiration for the test in this window.
- Unlink Account: This option simply breaks the connection from SecurityTrax to CMS for the Customer Account.
Adding An Agency:
- Click on the drop-down "View/Modify Site Agencies"
- Click on "Add Agency"
- Find the appropriate agencies and click on the "Number" on the left of the agency and these will be added to the customer account on CMS and SecurityTrax.